CAMERA SOFTWARE
This guide describes the Pixii camera software as seen on the camera’s own OLED screen: the shooting display, how the camera exposes, how to move through the menu, and every menu entry with its options. It is a reference — read it once to get the lay of the land, then come back to look up a single setting.
Some of these settings are also covered, more briefly, in the main User Manual. Where the two differ, this software reference is the more complete and current description.*
Screens in this guide are captured from the camera software itself. Your camera may show slightly different values depending on the lens, the installed firmware and your own settings. The short label shown in the menu list is given as each heading below; the longer title that appears once you open a setting is noted in the text.
THE OLED SCREEN
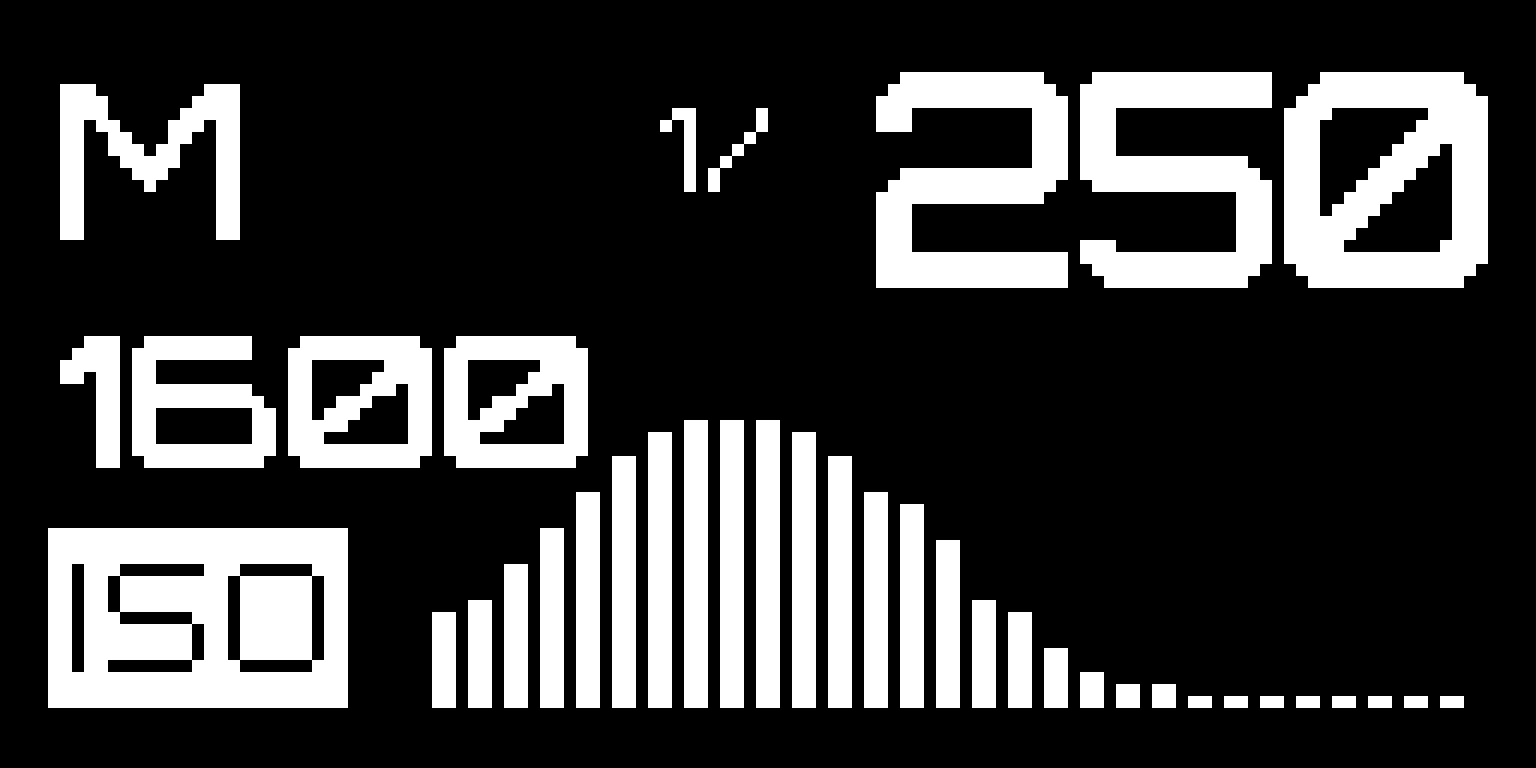
The small OLED on the top plate is the camera’s main display. It has two states.
*Active — shown while you shoot. The large characters are your current exposure: shooting mode (here M), shutter speed (1/250) and ISO (boxed when you are editing it). The vertical bars on the right are the live histogram. The bottom row carries the secondary indicators — white balance, exposure compensation, file format, Wi‑Fi link and battery.*
*Idle — shown after a few seconds of inactivity, to save power. It keeps the same information in a more compact layout and shows the estimated number of frames remaining (here 247).*

Quick edits from the shooting screen
In Modern menu style (Prefs ▸ Menu FX), change common settings without opening the menu. Turn the select wheel to move along the bottom indicator row — white balance, exposure compensation, metering, format. The indicator under the cursor lights up; press the select button to edit it in place, press again to finish. The cursor clears on its own after a moment, or half‑press the shutter to clear it at once — the next press then opens the menu as usual.
In Classic and Classic+ the wheel only cycles the viewfinder display, leaving your settings untouched until you open the menu — a protected mode. Modern adds this shortcut: the wheel pre‑selects an indicator, and a press unlocks it.
HOW THE CAMERA EXPOSES
A few ideas underpin almost every setting in the menu. Read this once and the rest of the guide will make sense.
Two exposure modes: M and A
You set the shutter speed with the speed selector on the top plate, and the aperture on the lens itself — Pixii is a rangefinder, so the aperture ring is on the lens, not in the menu.
- M — Manual. You choose the shutter speed on the speed selector. The camera shows it and meters the scene, but changes nothing for you.
- A — Auto. Turn the speed selector past its fastest speed to the A position. Now the camera sets the shutter speed automatically for the aperture and ISO in use (aperture‑priority). A small Auto lamp lights to confirm you are in this mode.
The mode letter (M / A) is always shown top‑left on the screen.
AE‑lock
If you enable A‑lock (in Prefs), turning the speed selector back off the A position locks the exposure the camera just computed, instead of dropping straight to Manual — a quick way to lock a reading, recompose and shoot.

Auto ISO
ISO can be a fixed value or Auto. In Auto, the camera raises the ISO only when it has to — and never above the ISO max ceiling you set. It also tries not to drop the shutter below your Exp min (minimum speed), so your frames stay sharp. These three settings — ISO, ISO max, Exp min — work as a team and only come into play in automatic exposure.
Exposure compensation and metering
EC nudges the automatic exposure brighter or darker; Meter decides which part of the frame the camera reads to begin with. Protect biases the automatic exposure away from blown highlights. All three shape what automatic exposure does; in full Manual they affect only the metering read‑out, not the exposure itself.

READING THE EXPOSURE
The indicator
The camera meters to a middle gray (18% reflectance) and shows the result on two matching indicators: the bar on the top plate and the one inside the viewfinder. Two triangles mean over- or under-exposure; a single white dot confirms a correct balance. In A the camera moves the shutter to centre that dot for you; in M the indicator tells you which way to turn the speed selector or the aperture ring.
This is what EC shifts: a + value tells the camera that “correct” is brighter than middle gray, a − value darker. In Manual the indicator still moves, but nothing changes for you until you act on it — the meter is only advising.
Two ways to lock a reading
A half-press of the shutter in A holds the metered shutter speed while you keep the button down — meter, recompose, shoot; it releases when you fire or lift your finger. The A‑lock preference is the slower, deliberate cousin: with it on, turning the speed selector off the A position keeps that automatic reading instead of dropping you into Manual.
Use the half-press for a quick reading in the moment; turn on A‑lock when you want a reading to survive past a single frame — set it once and shoot a series at that exposure. (See A‑lock under Preferences.)
EXPOSURE INDICATORS

NAVIGATING THE MENU
Two controls on the back of the camera drive everything: the menu I O button and the select wheel.
- Press the menu I O button to open the menu, and to select / confirm a value.
- Turn the select wheel to move between entries, and to change a value.
- A short press of the menu I O button opens a highlighted entry.
- To leave a value or step back one level, go to << BACK at the top of the list — or just half‑press the shutter to jump straight back to shooting.
The menu is a single scrolling list. Each line shows the setting name on the left and its current value on the right.


A double‑press of the menu I O button fires the Fn shortcut — one menu entry of your choice, reached in a single gesture. You pick which under Prefs ▸ Fn; by default it toggles colour / monochrome.

MENU MAP
The complete menu, in the order it appears on the camera. The label on each line is exactly what the camera shows.
Exposure and Image
MENU
├─ ISO ........ sensitivity — Auto, 80 … 25600
├─ ISO max .... ceiling for Auto ISO (320 … 25600)
├─ Exp min .... slowest shutter before Auto raises ISO
├─ Meter ...... Avg · Center · Spot
├─ EC ......... exposure compensation −3.0 … +3.0 (½ steps)
├─ Protect .... highlight protection — Off · Low · Std · High · Max
├─ WB ......... Auto · StdA · CFW · Daylight · Flash · Cloudy · Shade
├─ Format ..... DNG · JPEG
├─ Mode ....... Bayer (colour) · MONO
├─ Colors ..... colour profile (list from camera)
├─ Lens ....... focal length 12 … 135 mm (framelines + EXIF)
├─ Correct .... lens correction — Off · Apply · Embed
└─ Bright. .... screen brightness — Auto, 1 … 6
Network and Storage
MENU (cont.)
├─ Wifi ....... Wi‑Fi
│   ├─ network name / IP address
│   └─ Enable / Disable Wifi
├─ Storage .... card status + maintenance
│   ├─ Photos / Free / Total
│   ├─ Backup to USB
│   ├─ Erase all photos
│   ├─ Verify storage
│   └─ Factory reset
└─ USB ........ Disk mode · USB key · Transfer to key · Erase key
System and Preferences
MENU (cont.)
├─ System ..... firmware
│   ├─ Release (installed version)
│   ├─ Check / Install update
│   ├─ Poweroff
│   └─ Save logs
├─ Time ....... sync clock from the phone app
├─ Prefs ...... camera preferences
│   ├─ Fn       ├─ Sound     ├─ Menu FX
│   ├─ Susp.    ├─ Select    ├─ Histogram
│   ├─ Eco.     ├─ A‑lock    └─ VF Focus
└─ HW info .... service diagnostics (hidden)
EXPOSURE
These entries control how the camera meters and exposes each frame. They do their real work in Auto exposure (see How the camera exposes).
ISO
(opens as “ISO”.) Sensor sensitivity, from 80 to 25600, or Auto.
Lower ISO gives the cleanest, most detailed files; raise it only when you need a faster shutter than the light allows. Pick a fixed value when you want full control of grain (studio, tripod, consistent series). Choose Auto for run‑and‑gun shooting and let ISO max and Exp min keep it in bounds.
ISO max
(opens as “Max ISO”.) The highest ISO the camera may reach in Auto ISO, from 320 upward.
Set this to the grain you are willing to live with — for many people 3200 or 6400 — so Auto never hands you a noisier file than you’d accept. It only appears in the menu when ISO is set to Auto (on a fixed ISO it has nothing to do, so the camera hides it).
Exp min
(opens as “Min speed”.) The slowest shutter speed automatic exposure will use before it starts raising the ISO instead.
This is your anti‑blur safety net. A useful starting point is the old “1/focal length” rule: 1/60 for a 50 mm, 1/125 for a 90 mm. Set it faster for moving subjects, slower if you are braced or on a tripod and want to keep ISO down. Like ISO max, it only appears in the menu when ISO is set to Auto.
Meter
How the camera reads the light:
*Center is the safe default for rangefinder photographers — it reads the whole scene but leans on the middle of the frame. Use Avg only when the light is even across the scene. Reach for Spot in high‑contrast scenes — a face against a bright sky, a spotlit performer — to expose precisely for that one spot, then recompose (hold the reading with A‑lock if you like).*
- Avg — averages the whole frame.

- Center — weights the middle of the frame.

- Spot — reads a small central area only.

EC
(“EVbias”.) Exposure compensation, from −3.0 to +3.0 EV in half‑stop steps, shown as e.g. +0.0 on the status row. It moves the lightmeter balance above or below the reference middle gray (18% reflectance).
Use + to keep bright scenes bright (snow, beaches, white walls), − to protect highlights or deepen the mood. It shifts automatic exposure; in Manual it only moves the meter read‑out.
Protect
(“Hilight Protect”.) Highlight protection: Off · Low · Std · High · Max.
Each step tells automatic exposure to hold back more, to keep bright areas from clipping to pure white — skies, windows, stage lights, specular highlights. Higher settings darken the midtones in exchange. Std is a safe everyday choice; reach for High/Max in harsh light, drop to Off when you’d rather expose for the subject.
IMAGE
How the captured frame is rendered and saved.
WB
(“White Balance”.) The light source the camera balances colour against:
- Auto — the camera decides. Reliable for everyday shooting.
- StdA — standard illuminant A: incandescent / tungsten bulbs. Very warm (~2700 K).
- CFW — cool‑white fluorescent, the typical American office and shop lighting (~4150 K).
- Daylight — open daylight / midday sun.
- Flash — electronic flash.
- Cloudy — overcast skies; warmer than daylight.
- Shade — open shade; warmer still.
The fixed presets give consistent colour across a series — valuable when you don’t want the camera re‑deciding frame to frame. (Shooting DNG? White balance is stored as metadata, so you can still change it freely when you process the file.)
Format
The file written to the card:
- DNG — Adobe’s open raw format. Maximum quality and latitude.
- JPEG — a finished image, smaller and ready to share, rendered in‑camera.
Shoot DNG when you want the most from each frame and will develop it on a computer or in the app. Shoot JPEG for images that are ready to send straight away — they are rendered in‑camera using your Colors profile and white balance.
Mode
(colour mode.) Switches between Bayer (normal colour) and MONO (true monochrome).
MONO produces a dedicated black‑and‑white image, not a desaturated colour one — the cleaner, more contrasty result photographers choose monochrome for. This is the setting the default Fn double‑press toggles.
Colors
(“Colors” — the colour profile.) Chooses the colour profile the camera uses to render the in‑camera JPEG and the preview, and embeds in the DNG. The profile names are meant to be self‑explanatory; where a profile has numbered variants (variant 0, variant 1, …), those are alternative renderings of the same profile. In MONO mode there is no colour profile and the menu shows None.
Two profiles anchor the list. Default is the most compatible profile, but not the most accurate: it corrects colour with a matrix only — use it with raw editors that don’t read embedded DCP colour profiles, or whenever you specifically want matrix‑only colour. Standard is the most accurate: on top of the matrix it adds LUTs (the full DCP adjustments) to map the sensor’s native colour space as neutrally as possible onto CIE XYZ, the standard intermediate colour space; your DNG editor takes it from there to its own working and output space.
Correct
(“Lens Correction”.) Applies the optical corrections stored for the current lens — vignetting, distortion, chromatic aberration:
- Off — no correction.
- Apply — corrections baked into the image.
- Embed — corrections written as metadata so your software applies them (DNG only; behaves as Apply in JPEG).
Use Embed with DNG to keep the raw data untouched while still passing the profile along; Apply when you want the finished file already corrected; Off if you prefer to handle it yourself or keep a lens’s character.
VIEWFINDER & LENS
Lens
(“Lens focal”.) Tells the camera the focal length mounted, from 12 to 135 mm.
This selects the matching framelines in the optical viewfinder and records the focal length in the image metadata. Set it whenever you change lenses — it costs a moment and keeps both your framing guide and your EXIF correct.
Bright.
(“Brightness”.) OLED screen brightness: Auto, or a fixed level 1 … 6.
Use Auto to adapt to ambient light. A fixed level is predictable for very dark environments or when you want the panel to stop changing.
STORAGE & TRANSFER
Photos are written to the camera’s internal memory the instant you shoot — Pixii never needs a phone or a card to take or keep pictures. To move them off, you have several routes: to PixiiApp over Bluetooth (the default link) or Wi‑Fi; to a computer over Wi‑Fi or in USB Disk mode; or to a USB key with the backup feature.
Disk mode — copy to a computer
Connect the camera to a computer with the USB‑C cable, then open USB ▸ Disk mode. Pixii mounts as an ordinary USB drive; your images are under DCIM/101PIXII. Copy off whatever you need.

Eject (unmount) the drive at the operating‑system level before you unplug, then hold menu I O to power down. The camera deliberately does not auto‑power‑off while in Disk mode, so a long copy is never cut short.

USB backup — offload in the field
To free up internal space without a computer, connect a USB drive and open USB. Detect USB key shows its capacity; Transfer to key starts the backup, copying as many images as the drive will hold and stopping when it is full. Erase key wipes a drive first if you need the room.

Important: a backup moves images — each is removed from internal memory as it copies, to make room for new frames. Interrupting the transfer (a press of menu I O) does not put anything back: whatever already copied is already gone from the camera.
Any USB drive works: a portable NVMe SSD gives far more capacity and much faster backups, and the camera even accepts SD‑card adapters that present a card as a USB drive — for those who still like to shoot to SD.
Wifi
(network.) Turns the camera’s Wi‑Fi on or off and shows the connected network name and IP address.
Wi‑Fi is how the camera talks to PixiiApp and transfers images. Turn it off to save battery when you don’t need it.
Storage
Card status and housekeeping:
- Photos / Free / Total — image count and space.
- Backup to USB — copy images to a connected USB drive.
- Erase all photos — wipe the card (asks for confirmation).
- Verify storage — check and repair the card.
- Factory reset — restore default settings.
The Photos / Free / Total line is informational — press it to cycle the unit and the estimated frames remaining for the current format. The actions below it are housekeeping you’ll reach for rarely; Erase and Factory reset both confirm before doing anything irreversible.

USB
What happens when the camera is connected over USB:
- Disk mode — mount the camera’s card as a drive on your computer.
- USB key — shows a connected USB drive and its capacity.
- Transfer to key / Erase key — copy images to, or wipe, that drive.
The how-to is above — Disk mode to a computer, USB backup to a USB drive.
SYSTEM & TIME
Firmware, the clock and power.
System
Firmware and power:
- Release — the installed firmware version.
- Check / Install update — look for, and apply, a firmware update.
- Poweroff — shut the camera down from the menu.
- Save logs — write diagnostic logs.
Keep an eye on Release so you know which firmware you’re on. Save logs is the one to use when you’re reporting an issue — it writes a diagnostic file support can read.
Installing an update over USB
To update without Wi‑Fi, download the update file from dev.pixii.fr, put the camera in USB ▸ Disk mode, and drop the file into the updates folder at the drive’s root. Eject, then choose System ▸ Check / Install update — it finds the file and installs it, no network needed.
The on‑camera check looks for a hand‑placed update first, falling back to the online check when it finds none. Leave the file as downloaded; the camera unpacks and verifies it.
Time
Sync w/app — sets the camera’s clock and date from your phone via PixiiApp.
Like location assist, the camera keeps its clock in step with your phone: each time the app connects it refreshes the date and time, so daylight saving and time‑zone changes follow automatically. Keep the app paired and it stays right; run Sync w/app by hand any time to set it straight away.
PREFERENCES
Personalise how the camera behaves (the Prefs sub‑menu).
Fn
The single menu entry the double‑press shortcut jumps to.
Set it to whatever you change most — ISO, white balance, colour / mono.
Susp.
(suspend timer.) How long before the camera suspends to save power: 30 / 60 / 120 / 180 s, or Off.
Shorter saves battery; Off keeps the camera awake through a shoot where you don’t want to wait for it to wake.
Eco.
A low‑power eco mode for the sensor bridge: On / Off.
Trades a little responsiveness for battery life.
A‑lock
(auto‑exposure lock.) On / Off.
When on, turning the speed selector back off the A position locks the exposure the camera just computed instead of dropping to Manual — meter, lock, recompose, shoot. (See How the camera exposes.)
Sound
Feedback volume, from off to loud.
Controls the camera’s clicks and confirmation beeps.
Select
(wheel sensitivity.) How the select wheel steps through values: Direct (one click per step) or 2× (two clicks per step).
Use 2× for finer, less twitchy adjustment when you find values changing too fast under your thumb.
Menu FX
The menu’s visual style: Classic, Classic+, Modern (animated).
Pure taste — pick the feel you like.
Histogram
Which data the live histogram is built from: RAW (straight sensor data) or JPEG (the rendered image).
Use RAW to see true clipping in the sensor data; JPEG matches what the finished picture will look like.
VF Focus
In the optical viewfinder’s secondary display, which indicator stays pinned while the others scroll past: Hist · Speed · ISO · Meter · EC · HL.
Pin the one you watch most, so it’s always in view while the rest cycle.
HW info
A hidden service menu of hardware diagnostics (sensor reset, viewfinder tests, GPS toggle, …).
It is intended for service and is not shown in normal use.