USER MANUAL
Thank you for choosing Pixii
Dear customer,
We would like to thank you for purchasing a Pixii camera and congratulate you on your choice.
The Pixii team worked very hard to design, manufacture and calibrate the camera you now have in your hands.
We wish you a lot of pleasure and success using your Pixii camera. We hope it will serve you well and inspire you to create your best photographs.
CONTENTS
-
- Install a battery
- Install a lens
- Turn on the camera
-
- Automatic exposure adjustment
- Adjusting the focus with the rangefinder
- Capturing images
- Camera settings
-
- Speed selector
- Navigating the camera menus
- Optical viewfinder indicators system
- Exposure Compensation (EC)
- Recharging the camera battery
- Disk mode
- Usb backup
- USING PIXII WITH YOUR SMARTPHONE
- Install PixiiApp
- Connect with the camera
- Image transmission and storage
- Overview of the application
- Configure Wi-Fi mode
- GOING FURTHER

- 1.1 Lens release button
- 1.2 Luminosity sensor
- 1.3 Rangefinder window
- 1.4 Main viewfinder window
- 1.5 Eyelets for carrying strap

- 2.1 Exposure indicator
- 2.2 Release shutter
- 2.3 Speed selector
- 2.4 Control screen
- 2.5 Accessory shoe & cover

- 3.1 Viewfinder eyepiece
- 3.2 Camera status indicators
- 3.3 Menu selector
- 3.4 Selection confirmation button
- 3.5 Charge indicator
- 3.6 Multi-purpose USB-C connector

- 4.1 Battery compartment lock
- 4.2 Tripod socket
- 4.3 Anti-slip sole
VIEWFINDER
Pixii models, except Pixii Max

Pixii Max frame lines
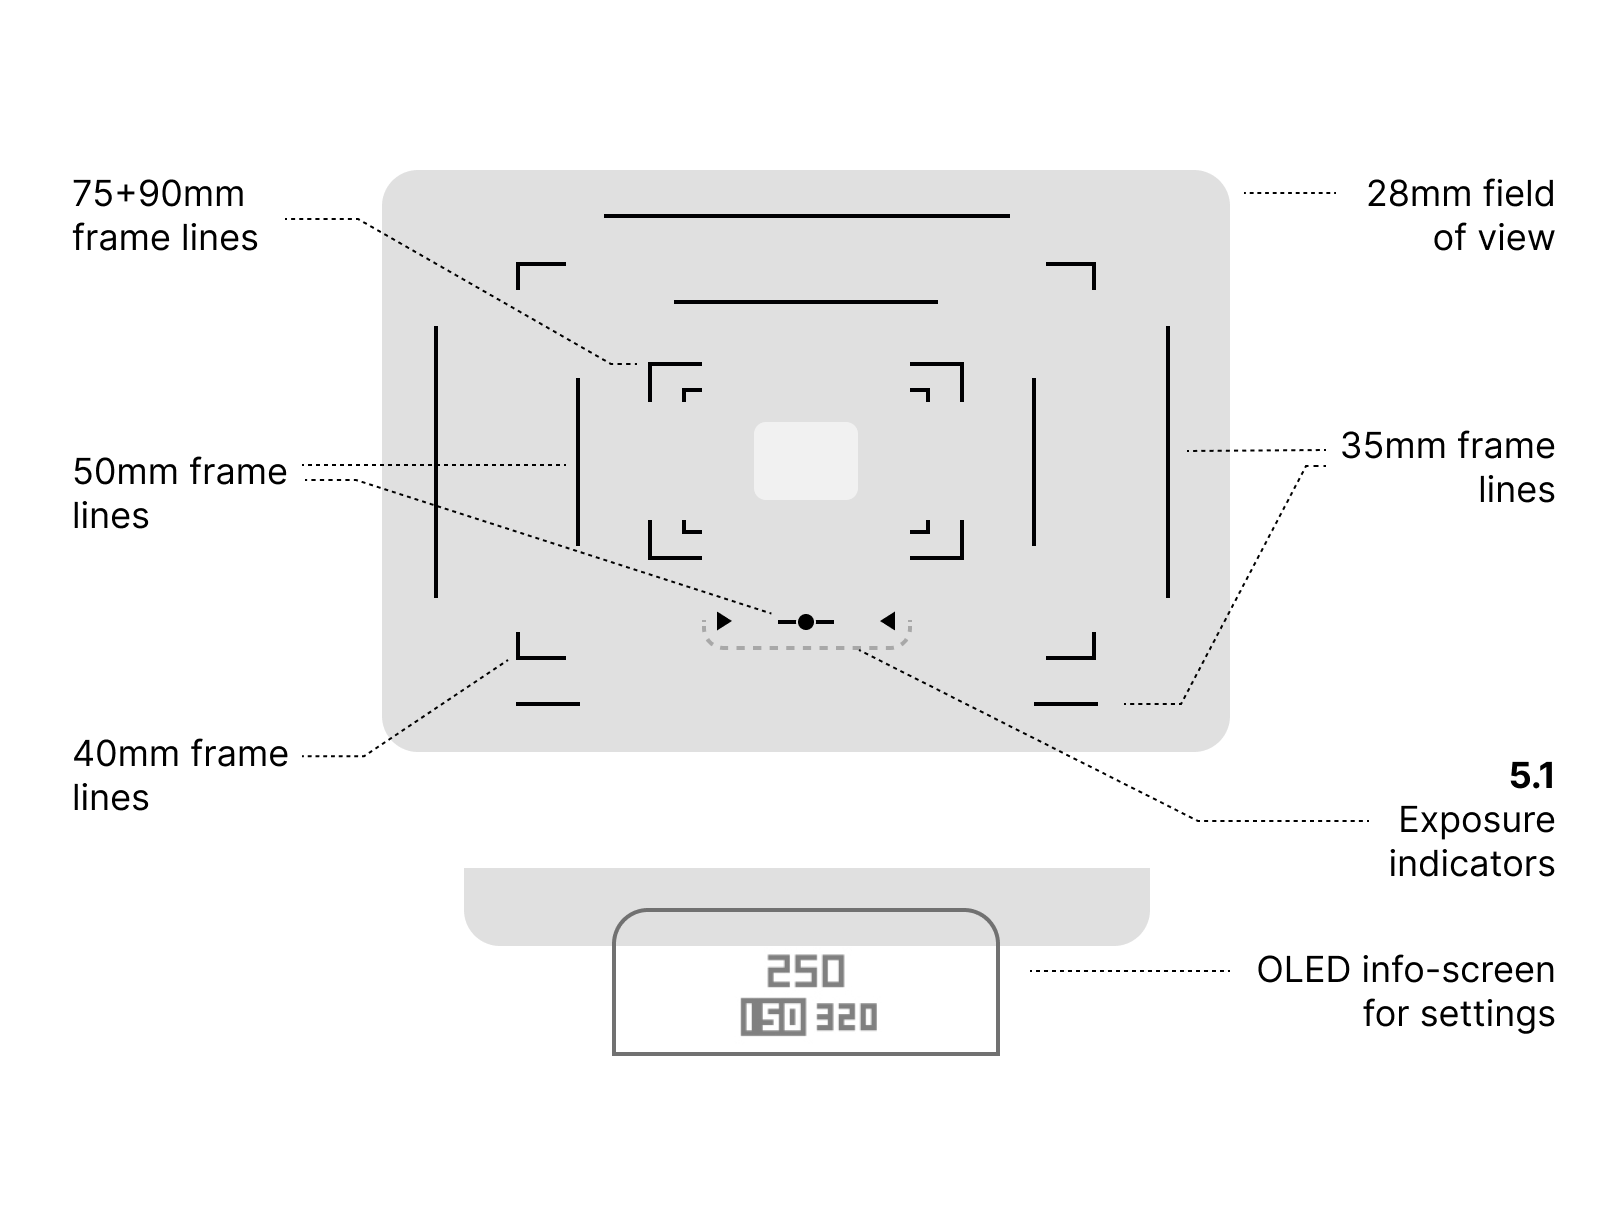
Note for Max users Use the larger viewfinder field of view with 28mm lenses. The 50mm bottom frame line is coincident with light meter indications: you can use the red arrows or the white dot to frame your picture.
OLED SCREEN


GETTING STARTED
INSTALL A BATTERY
Flip up the toggle [4.1] on the battery cover. Turn it as far as the stop and lift off the battery cover. Insert the battery into the compartment, notice the golden battery socket at the bottom of the compartment. Align the battery termination clips with the socket in the compartment. Push until the cap is flush with the camera bottom and turn the toggle back into position to lock the battery.
For Pixii Max Please note that the battery pins are on the opposite side of the camera, compared to previous models.

INSTALL A LENS

Align the marker on the lens with the lock button on the camera mount [1.1]. Insert the lens base into the mount and slowly turn towards the right until you hear a click.

Push to release: depress the lens lock button and turn the lens in the opposite direction to release it.

Note: the lens mount is designed to accept Leica M compatible lenses. You can also use M39 lenses with an adapter (not included).
TURN ON THE CAMERA
Push the menu I O button for 2s. The camera screen displays the PIXII logo and will then display the main screen with exposureparameters: Pixii is now ready to take photos.
Automatic power control: the camera puts itself in sleep mode and will power off after a few hours of inactivity.
Manual power off: simply press again 2s on the menu I O button to turn off the camera.
Quick start: half-press the shutter release to wake up the camera from sleep mode.

TAKING PICTURES
AUTOMATIC EXPOSURE ADJUSTEMENT
Put the speed selector in position ‘A’ [2.3]. Half-press the shutter.
Pixii will automatically program the exposure time according to the current illumination of the scene.
If you change the aperture setting on the lens, the camera will adjust the exposure time correspondingly.
The exposure indicator on the camera body [2.1] and inside the viewfinder [5.1] will reflect the setting, with the white central dot indicating a correct exposure.
AE-Lock: hold the shutter button down halfway to lock the exposure time. The exposure value is unlocked when the shutter is triggered or the button is released.
ADJUSTING THE FOCUS WITH THE RANGEFINDER
Turn the lens focus ring with the help of the optical rangefinder.
Observe the center of the viewfinder and the double image that appears.
Turn the focus ring on the lens until the 2 images coincide at the point you want to focus on. The maximum sharpness will be reached at this point in the image.
Tip: to ease focusing, find vertical elements in the scene and try to align them with the second image from the rangefinder.
CAPTURING IMAGES
Press the shutter button fully.
The camera will emit a discrete sound to confirm the image capture. The frame lines will also fade out briefly to provide additional visual confirmation (useful in noisy situations).
Photos are immediately saved in the camera memory.
CAMERA SETTINGS
Press the menu button at the back of the camera [3.4], navigate with the selection wheel [3.3] and validate your choice by pressing again on the menu button.
The first part of the menu presents settings related to image capture parameters, exposure and recording. The second part of the menu gathers settings related to the wireless connection, the storage and the system.
All settings can also be accessed and changed from the mobile application.To exit the settings menu, simply half press on the shutter button.
EXPOSURE INDICATORS

USING THE CAMERA
SPEED SELECTOR
The speed selector [2.3] has only one role: to control the exposure speed.
Manual mode: turn the button to select the exposure speed, the speed is reflected on the adjacent screen.
Auto mode: position the index of the selector on the ‘A’ position: the camera will automatically compute the exposure speed.

NAVIGATING THE CAMERA MENUS
Camera settings can be changed via a system of menus.
Enter the menu system with one press on the menu I O button.
Change the selection with the select wheel, then validate your choice by pressing the menu I O button.
To exit the menu system and get back to the active camera mode, you can either :
- navigate up to the top of the menu system and select the < back option that appears
- or just half-press the shutter

The menu system is accessible from both the top screen and from inside the viewfinder in a condensed form.
ISO
Sensor sensitivity setting. From 80 to 25600. The native sensor sensitivity is set at ISO 160.
Note: using a high sensitivity gradually increases the level of digital noise, which may require post-processing.
Auto Iso By choosing AUTO sensitivity, the camera will automatically determine the sensitivity according to the ambient illumination. Two additional parameters appear in the menu:
Max ISO to set the maximum sensitivity; Min Speed to set the minimum exposure.
EC
Exposure compensation: applies a negative or positive weighting to the exposure measurement. See the section below for more details.
METER
Choice of the camera’s different exposure measurement modes.

AVG (Average) The camera uses the light information from the entire scene and computes an average for the final exposure setting, giving no weighting to any particular part of the metered area.

Center The camera takes into account the whole scene, but puts more emphasis on what is around the focal point. This is the natural setting for a rangefinder camera.

Spot Spot metering measures light intensity only at the focal point, completely ignoring the surroundings.
Tip: combine Spot or Center metering mode with AE Lock to more precisely control the exposure. Aim at high contrast zones of the scene and lock the exposure. You can then move and change the framing of the picture without risking to burn high intensity zones of the image. With a dynamic range of 13.5 EV, anything that is under-exposed by this method will be very easily exposed by your processing software. Alternatively, you can select a longer exposure to reveal details in the shadows, while the automatic exposure might propose a higher speed to protect the highlights.
WB
White balance setting. In Auto mode, the camera dynamically determines the temperature of the ambient lighting. In more complex lighting situations, fixed settings can also be used :
StdA: incandescent source (2700K) CFW: fluorescent lighting (3800K) Daylight: daylight (5500K) Flash: photographic flash (5500K) Cloudy: cloudy / overcast (7500K) Shade: shadow / evening light (9000K)
PROFILE
Color profile, including tone curve and color adjustments. The selected color profile is embedded in the DNG file and can be changed in post-production.For JPEG images, the color profile adjustments are directly applied to the image pixels. Choose Standard for best colorimetric accuracy. Choose Default for compatibility with software not supporting advanced DNG color profiles (DCP).
FORMAT
The DNG format records all the information captured by the sensor. The JPEG format saves the image in a compressed format. This format allows for direct visualisation on a computer or phone, and smaller file sizes at the expense of a lower dynamic range and quality (see table below). We recommend to use the DNG format to take full advantage of the quality of the Pixii sensor. DNG is an open standard created by Adobe. Pixii files are officially supported by Adobe Camera RAW.
LENS
Select the focal length of the lens mounted on the camera. The viewfinder will illuminate the corresponding frame lines. You can select focal lengths from 12mm to 135mm. Note that only the 28, 35, 40 and 50mm frame lines will appear in the viewfinder.
Note: the selected frame lines take the sensor format into account. There is no need to apply an APS-C format coefficient to the selected focal length.
WIFI
The menu displays information about the Wi-Fi link: the name of the network to which the camera is connected and the IP address allocated to the camera. Use the app to connect the camera to a Wi-Fi network. Chose Enable or Disable to turn Wi-Fi on or off respectively. Disabling Wi-Fi can help limit power consumption.
STORAGE
The 1st page of the menu displays storage usage information: number of photos, space left and total storage capacity. Press any entry iteratively to express the capacity in bytes or in number of DNG or JPEG files.
The 2nd page of the storage menu provides options for managing the internal storage: USB backup for saving photos to a USB key Erase all, to remove all photos on camera Verify storage, to repair the filesystem in case of errors.

USB
Menu to control the USB features of the camera. See the section below for more details.
TIME
Displays the camera date and time. The camera clock and time zone are automatically synchronized when paired with your smartphone.
SYSTEM
Displays the version of the camera software. The camera will periodically check for available updates and will display them in this menu. Select the Update option to manually check for available updates. Choose the Install option to flash the camera with a new software update.
Note: the camera needs to be connected to a Wi-Fi network to access new software updates.
PREFS
Fn By double clicking on the menu button you can directly activate a camera menu option, without having to enter the menu first.This shortcut can be configured to access an often used setting. By default, the Fn shortcut is set to toggle the sensor Bayer or Mono mode. You can program it to quickly access another menu, such as: ISO - EC - Meter - WB - Format - Mode - Profile - Lens or None.
Eco Enables or disables the Eco mode. Eco tries to optimize the camera battery life by adjusting various internal parameters.
Susp When the Eco function is enabled, this setting configures the timer duration for automatically putting the camera to sleep.
A-Lock This setting locks the speed selection to Automatic Exposure, to prevent an accidental change of the shutter speed.
Note: setting the standby mode to eco «Off» keeps the camera very responsive but limits the battery life.
OPTICAL VIEWFINDER INDICATORS SYSTEM
The viewfinder of Pixii provides several visual indicators to the photographer.
The framelines delineate the portion of the scene captured by the image sensor. The illuminated framelines reflect the focal length selected in the LENS menu option.
The framelines will follow the lens focus position with an automated parallax correction mechanism.
The exposure indicator [5.1] integrated in the viewfinder uses the same symbols as the indicator present on the top of the camera.
Triangles indicate an over- or under-exposure. The white dot confirms the correct exposure balance.
The info-screen displays supplementary indications in the lower part of the viewfinder.
By default, the exposure speed is displayed.
You can personalize the indications presented in the viewfinder by directly playing with the select wheel to scroll through the various options. The last option sets the viewfinder in classic mode, turning off this screen.
The info-screen will also display the camera menu, when pressing the IO button. This allows for quick setting changes without leaving the viewfinder.

EXPOSURE COMPENSATION (EC)
The exposure compensation setting lets you modify the balance of the lightmeter system, above or below the reference middle gray (18% of reflectance).


To change the exposure compensation:
select EC in the menu (section 1)
turn the select dial [3.3] to the left or right to change the setting
In manual mode, the setting only influences the exposure indicators.
In Auto mode, the setting also changes the computation of the exposure speed.
Note: for quick access, the EC menu can be assigned to the shortcut (see Prefs/Fn menu)
TRANSFERRING IMAGES
You can turn your camera into a USB drive to view and transfer photos on a computer.
To switch to disk mode:
- connect the camera to a computer using the USB cable supplied.
- then enter the camera USB menu and select «Disk mode».

Note: when operating in “Disk mode“ Pixii does not turn off automatically.
Pixii will appear as a USB hard drive on your computer desktop. Photos are stored in the standard sub-directory: DCIM/101PIXII.
When finished with USB transfers, unmount or eject the disk at the operating system level before physically disconnecting the camera. Then press the menu | O for 2s to power off the camera completely.

USB BACKUP
This feature transfers photos from the main camera memory onto a USB drive. The main purpose is to make room for taking new images.
Go to the camera menu with menu I O and select “USB”.
Connect your USB key to the camera.
Select “Detect USB key“ in the menu: the camera will detect and display the capacity of the USB drive.

Select “Transfer to key“, to begin the backup.

While the transfer is in progress you can interrupt it by pressing on the menu I O button.
IMPORTANT: as images are moved to the external storage they are REMOVED from Pixii’s internal memory.
Interrupting the transfer doesn’t revert the backup process: all images that have been transferred will have already been removed from the internal storage of the camera.
The camera will only transfer AS MANY images as possible depending on the remaining capacity of the external drive. The transfer will automatically stop if there is no space left.
You can also erase the content of an external USB drive from this menu before making a backup.
USING PIXII WITH YOUR SMARTPHONE
INSTALL PIXIIAPP
The Pixii application is available on the AppStore for iPhone devices, or Google Play Store for Android devices.

CONNECT WITH THE CAMERA
The application will start and guide you through the steps for pairing your Pixii camera and your smartphone. Once established, Pixii will automatically pair back with your smartphone on power up.
IMAGE TRANSMISSION AND STORAGE
As soon as you press on the shutter, Pixii will send a preview image for control on your smartphone
You can watch images directly to verify your exposure settings, or wait until the end of your photo session not to be disturbed by the screen.
Note: your images are always immediately and safely stored in the internal memory of the camera. Your Pixii camera does NOT require a phone to take pictures.
OVERVIEW OF THE APPLICATION
The application is comprised of 3 main parts.
The central welcome screen [PHOTO] displays the last photos taken with the camera. You can navigate inside sections and groups of photos to display the images, access photo details (EXIF), transfer and share your images.
The [CAMERA] screen gathers settings related to camera image capture parameters. It allows you to program and trigger an exposure remotely in complement with the camera settings already accessible on the camera.

The [SETTINGS] screen lists parameters related to the mobile application and its association with the camera. It lets you control the camera status, the wireless links and other operating parameters.
CONFIGURE WIFI MODE
Wi-Fi will accelerate image transfers and let you edit images with your phone.
First, make sure the camera is powered-on and already paired with the app. From the application, go to the Settings screen. The indicator next to connectivity should read Bluetooth.

Navigate to the Connectivity screen and make sure that the camera Wifi is switch on (blue).

Tap “Search for networks…”, and wait for the device to detect the surrounding networks. It may take a few seconds before networks start appearing. Get the camera closer to your router and repeat the search if your network doesn’t appear in the list.

Select the network you want the camera to be connected with.
Generally this is your home network, but It can also be your phone hotspot for fast image transfers even while on the go.
Note: having a network providing Internet access is recommended, as it will let the camera download software updates.

Enter the network access password (WPA) and validate. After a few seconds your camera should be connected to this new network with a validation mark ✓ appearing next to it.
Pro-tip: To verify that your camera is connected, tap on the network entry to unfold it and display its IP address.

The camera will now automatically reconnect to this network.
If you configure multiple networks, the camera will automatically connect to the one it detects, and in priority with the first network you configured.

GOING FURTHER
We hope you enjoyed taking photos with Pixii with using this guide.
Visit our site pixii.fr to know more about features and techniques and to learn about new software releases for your camera.
For all questions regarding your camera contact us at support@pixii.fr